
Part 1 | Part 2 | Part 3 | Part 4 | Part 5
Part 4: Visual Social Media
Three weeks ago, I shared my descent into social media and my guiding philosophies for interacting with others on the internet. Two weeks ago, I discussed the generals about creating a website and starting a blog. Last week, I discussed Facebook, Twitter, and hashtags.
Today? I’ll be discussing The visual social mediums!

On this social media, you share an image, with a short caption and some hashtags.
Once again, I recommend using the same name, profile picture, and short biography as you do on your Facebook and/or Twitter, for that all important brand consistency.
This is a good, low-intensity entrance to social media to anyone with a smartphone or iPad. Posting 1-3 times a week is a good rate of interaction.
You can also comment on and ❤ other people’s photos.
Typically, you share a photo that you’ve taken, but you can also create images or share memes here. It’s really not set up to let you add images from a computer, though, so a camera-enabled wifi/data enabled device is required.
It easily syncs with most other social medias, sharing the links for you.
- Personally? I reshare to Facebook, but I copy and repost to Twitter and Tumblr, because I want people to see the image, not a link back to Instagram. I *think* you see the image on phones/etc, but they’re hidden on
Uploading Images:

Step One:
When you go to upload an image, your current camera gallery will load on default. Whichever image you select will be cropped into a square. You can pinch the screen, to zoom in or out and try to recenter the image, but if it doesn’t fill the square, preview images will clip the edges.
You can do multiple pictures, either in a collage or as a set people can scroll sideways through.
Or! You can upload a video.

Step 2:
The app gives you a LOT of editing tools. I usually leave them alone, but you can swype to the left on the tools row for all the options.
You can change the color, saturation, brightness, focus, contrast, just for starters!
Step 3:

The app provides a LOT of filters to select from.
They’re preset configurations for all the edit options from the previous tab. You can pick one, and then customize it by selecting the EDIT tab on the bottom left.
Typically, it’s suggested to find 1-3 filters you really like and stick with them, for that all-important BRAND idea. That way, when looked at en masse, your images will mesh well together.
NOTE: You can always hit the back arrow if you want to adjust the cropping.
Step 4:

This is where you add the details:
- captions
- hashtags
- tag people (@username)
- tag locations (if Location is turned on, it can auto-sense these.
- select the social medias to which you wish to cross-post
Instagram Community: Hashtags and Photo Ideas
As with Twitter, it will show you the popularity of any hashtag you start to type and autocomplete your most commonly used ones.
Some recommended hashtags are (hat tip to Alejandras Life):
- #writersOfInstagram (selfies, or pictures of your work)
- #amWriting (pictures of your work, or you working)
- #amReading (pictures of the book your reading)
- #TBR (pictures of what you’re reading next)
- #writersLife (selfies, behind-the-scenes shots)
- #wordPorn (images of quotes– from others or from your own writing)
- #writersBlock (pictures of what’re you doing while blocked)
- #amEditing (you know, what 90% of your writing consists of…)
- #writersFollowWriters – (a recent tag, to introduce yourself to other writers and find people to follow and support!)
- #noFilter – a way to brag about a picture that turned out great, and didn’t need any help
Images Used Elsewhere
After I drafted this post, I went to look at my feed and saw that my local news channel had asked to use a photo I’d posted on Instagram, and cross-posted to Twitter today. And offered accreditation
I swear, I’d already drafted the rest of this post before she asked.
So… that’s a thing that can happen. And… she opted not to. Maybe she’ll use it later this week?
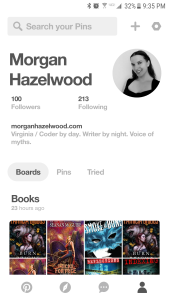
This is a social media where, as you browse the internet and see pretty pictures, you can click to save them to a Pinterest folder.
You can ‘follow’ people and see what images they save, and they can do the same for your boards. There’s also a direct message option, but I haven’t been bombarded with spammers, so it’s relatively safe.
Once again, you’re going to want a pretty consistent name, profile picture, and bio. Then, if you’re like me, you’re going to want to organize your “Pins”, the images you’re saving.
So, you can create different ‘boards’ to pin images to. You can have private boards, friends only, or public boards. Many people use them for consolidating remodeling ideas, wedding planning, or suggested styles for clothing subscription services.
The general theme is that you’re “pinning” the images up, as if to a bulletin ‘board’, so you can see them all at once.
The Plugin
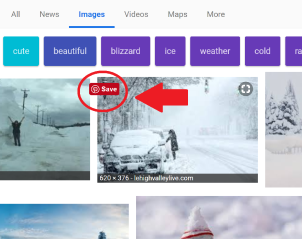
How do you save all these images?
With the quick installation of the plugin (a bit of code that makes the Pinterest logo show up when your mouse is hovering over an image, or when you tap-and-hold an image for a touchscreen), all you have to do is select that logo and a pop-up will ask you which ‘board’ you’d like to save the image to.
Ways to Use Pinterest as a Writer
I set up boards for inspirational actors/models for my characters, locations, and clothing and left Pinterest alone for a year. These are helpful for ME when writing since I tend to be somewhat less visually focused.
I’ve recently got back into Pinterest. These days, I’m also posting and/or resharing:
- memes
- blog post images with link-backs to my posts!
- pictures of books I’m reading
You can browse Pinterest, or anywhere on the internet, look for images you like, and pin them to your own boards.
Use hashtags as before, but the visual is what really sells things.
The internet, especially on smartphones, is a very visual place. It’s far easier to ‘like’ a picture than write a comment.
As entries to social media, Instagram and Pinterest involve the least amount of time and effort on your behalf. Plus, they’re both used (especially Instagram) by young adults.
So, for those of us who write YA, it’s a good idea to establish a presence on a media that your future audience actually uses.

Reblogged this on Viv Drewa – The Owl Lady.
LikeLiked by 1 person
Thanks for the reblog!
LikeLike
Video Link failed.
Hmmmm…
On Thu, Mar 22, 2018 at 7:36 AM, Morgan S Hazelwood wrote:
> Morgan Hazelwood posted: “Part 1 | Part 2 | Part 3 | Part 4 Part 4: Visual > Social Media Three weeks ago, I shared my descent into social media and my > guiding philosophies for interacting with others on the internet. Two weeks > ago, I discussed the generals about creating a website ” >
LikeLiked by 1 person
Whoops! I moved up the post time to catch you early birds, and forgot to move up the post time for Youtube. Fixed now.
LikeLike
Reblogged this on Plaisted Publishing House and commented:
Starters Guide for Writers – Part 4
LikeLiked by 1 person
Thanks for the reblog!
LikeLike
Thanks for this post 🙂 I think I struggle with Instragram a lot since its a mainly visual medium and I’m much more comfortable writing a wall of text, haha. Do you have any suggestions for what sorts of photos we should upload? A screenshot of my Word document would make for a very boring feed!
LikeLiked by 1 person
Check out the suggestions by the hashtags, but your computer set up, or a mug of hot coffee/chocolate are always sweet.
Close ups of Chapter headers or page numbers can be announced to congratulations.
I like to use the QuotesCreator app to upload images of word art made with my favorite quotes.
Pet photos are ever popular on fb.
Book covers for what you’re reading, or your massive to-read pile.
Stacking books to spell out words…
I usually mix writing pics with slice of life or nature pictures.
LikeLiked by 1 person
Thanks for the tips! I’ll have to fish out my nice mug for these. I rarely drink tea while writing but for Instagram, we’ll just pretend 😉
LikeLiked by 1 person
You can always drink water out of it, if you tip the angle just right, no one will know! #doesntDrinkTeaOrCoffee
LikeLike
Just found your website. Great series!
LikeLiked by 1 person
Thanks! I like to be helpful and share what I’ve figured out. (Even if trends are likely to change in 5 minutes…)
Best of luck!
LikeLike
Great post. I love using Pinterest. As a writer I use it to create individual storyboards for what I’m writing. So I mostly pin images my characters are based on. Music my characters listen to or share the same mood of the story. Type of clothes they wear. A few articles detailing their work back ground. The WIP I’m working on feature women who do divination (tarot card, crystal ball, meditation and token scrying). So in that particular board I have a lot of pins on the tarot and the card meanings. The meaning behind images in the crystal ball. A lot of yoga positions and its benefits and psychics.
LikeLiked by 1 person
I’d definitely used Pinterest before to organize character boards for myself. And when all you’re doing is revising… mine was stagnant for a while.
Figuring out how to use it to connect with other writers/readers is a little trickier.
LikeLike