
Well, that was more complicated (and a little $$) than expected.
Until Monday, I Thought I Didn’t Need An Actual Email List
If you’re like me, you keep hearing how you’re supposed to cultivate that whole ’email list’ thing.
One problem.
I hate email. I like to read, archive, and keep my inbox under 25 items–aiming for Zero Inbox.
Besides! WordPress lets people sign-up with their emails, so they can get the updates that way. Right?
Apparently, I missed a small little detail.
When I FINALLY (after like 4 years) re-signed up to see what my email looked like? I learned You’ve Got To Have A WordPress Account To Subscribe!
Don’t get me wrong. When I set up my blog, four years ago, I checked out the first several emails, to make sure they looked fine. But? I had a wordpress account, so I didn’t even notice.
Besides? If I want to check out my blog, I view it on an RSS feed.
What’s an RSS Feed?
It’s a way to follow blogs and get all their updates — like Facebook, only you’re following Blogs, not individuals. Tumblr is actually an RSS Feed, but you can only follow other Tumblr blogs.
Whoops!
I know that’s gonna turn off people who don’t want ANOTHER account.
That’s When I Realized I Needed An ACTUAL Email Newsletter
I did some quick googling, and went with the one I saw most recommended, most used, and was FREE! (At least with my level of followers…)
So, next thing I know, I’ve got a freebie MailChimp account (so long as my mailing has fewer than 2,000 emails a month, I don’t have to pay a thing!) Plus, they promise a seamless experience when you switch to the paid levels. $10-$30 bucks until I have over 2,500 followers. [Sign up HERE!]
I went to the website, created an account, set up some groups, and then?
I created an automated welcome email and weekly RSS feed emails.
That’s when I notice something.
They’re posting my HOME ADDRESS. Eep! Not really something I want to provide to any online stalker. With a note that says US anti-spam law REQUIRES an address on any sort of mass emailing.
Sad trombone!
Fine. I’ll get a P.O. Box.
But wait.

It needs a physical address?
A little research later and I found a nearby Post Office that also lets you use their street address. I sign up online, pay, and… need to go in, in person, to get the key and show ID.
I pop on over on my lunch break, during this gorgeous 68′ February flash-spring and present my Passport and Driver’s License. Only 2 people ahead of me in line.
After a short wait, I hand over my papers. Only problem. I moved last year and my driver’s license is out of date– despite me updating them.
I dash out to my car and rifle through my glove box. My insurance card doesn’t have an address on it. But wait, what’s this folded piece of paper. My voter information sheet, telling me where to vote? Does it count as my voter ID?
I bring it back in, fingers crossed. With no line, I beeline to the counter and hand it over.
Does she accept it?
YES!
A few signatures later (and $92 for 12+1 free month, otherwise known as $7 a month), I now have a PO Box. She gets me two keys to test and hands me the paper with the street address to use.
Fun Fact:
It’s a different zip code than the street address of the normal post office.
Long story short — I now have a PO box with a street address and an email newsletter.
(Now I can use THAT when I win random twitter contests, instead of giving my mailing address to strangers.)
Quick Humble-Brag Break
I’m well on my way to hitting my reading goal for this year, with 16 books already under my belt.
And? Last Friday, I talked to my new mentor on the phone.
Mentor? Tell me more, Morgan.
I sent in a mentee application just before New Years to the Broad Universe‘s debut program and found out I was selected two Saturdays ago. We’d been emailing back and forth for a week, before we finally talked to start making a plan and for her to critique my 1st chapter.
That poor chapter’s been critiqued SOO many times. But, getting enough world building that no one is confused, without overwhelming them with info-dumps is a hard balance — and likely in a different place for every reader. I’ve got a little more work to do there.
As you know, I was planning on a little polishing and tossing her back into the query trenches. I’m sighing a little and getting ready to delve back into a full revision. Oh well. I’ve got high hopes and a guide, this time.
But! Back to MailChimp.
Getting Started With Groups On MailChimp
After MailChimp walked me through setting up, I knew I wanted custom email levels. I HATE stores that send either 7 emails a week or NOTHING. So, I looked around and figured out how to set up GROUPS.
Step 1: Open the list

Go to the Lists tab (create one for everyone who’s received a welcome email if you don’t have one yet), and select the list.
Step 2: Manage your contacts

Select the ‘Manage Contacts’ drop down.
Step 3: Select ‘Groups’

Step 4: Create your groups

Click ‘Show Groups’. Then, select ‘Add Group’ and name it as you wish. If you do this early, like I did, you won’t have to add contacts manually, they’ll be prompted when they sign up!
And Ta-daaa! You’ve created groups, so people only get the emails they’re interested in.
My groups are:
- Everything! (which I’m sure is what most people want *winks*)
- Weekly Blog posts — which I plan to only send out once a week with all my newest blog posts inside
- Occasional Updates — if I have news or such that I’d like to share with a targeted audience
- And a group I like to call, “Actually Published Something“, for those people who support my writing, but don’t care about the details. Just let them know when I have something new coming out.
Creating The Actual EMAILS
MailChimp made this SUPER easy, with its built-in templates. But, there’s still a decent number of steps. You ready?
Step 1: Create A Campaign

We start off by selecting the ‘Create Campaign’ button.
Step 2: Select Campaign Type
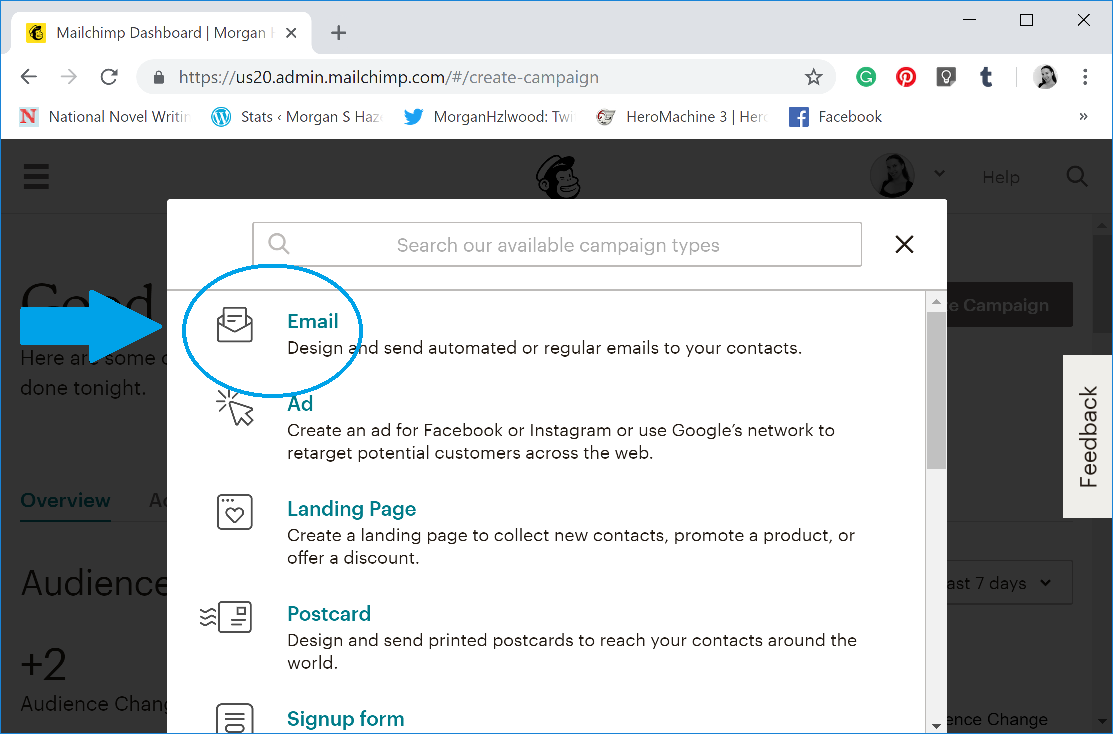
In this case, I’m looking for EMAILS.
Step 3: Automate This Thing!

I set up 2 types of Automated emails, a simple confirmation/welcome email, and a weekly blog feed.
In this case, I’ll be showing the RSS feed, because it’s a bit tricker, but the flow is nearly identical. So, select the ‘Automated’ tab, and then pick your email type.
Step 4: Name Your (Email) Campaign

Set a name for the campaign and select the list you’re using. (Luckily, you’ve already got that list set up!)
Step 5: Map Your Feed and Schedule It

- Enter the RSS feed address. Typically, your address plus “\feed”, but if you’re not sure, just put in the URL and MailChimp will check for you.
- Set the email period – daily, weekly, monthly…, set the time of day, and set the days of the week you’d like to email (IF there is something new.)
- I saw complaints about poor quality images in the email feed, and saw recommendations to UNSELECT the ‘Resize RSS feed images’, so I did that.
Step 6: Select Which Group Gets This Email
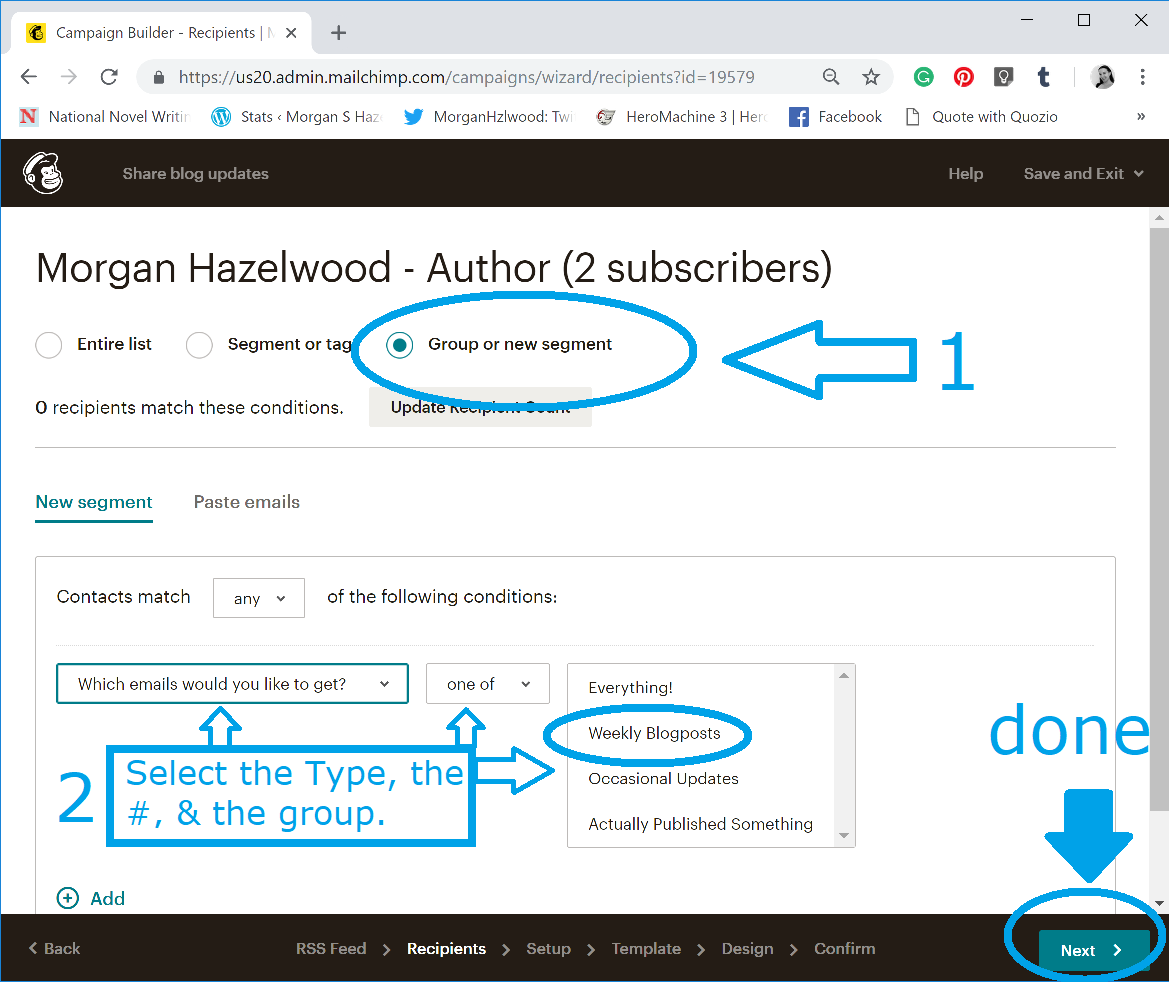
- Decide who gets this email: everyone? a segment/tag? or a group? I’ve got my groups set up, so that’s what I choose.
- Select the question under ‘Groups’:
- “Which emails would you like to get”
- Select the modifier, and the groups they’re in.
- Maybe this email should only go to people who selected Occasional Updates AND Actually Published Something?
- But no. I went with “one of” and “Weekly Blogposts.
- Click DONE!
Step 7: Select Your Campaign Options

To be honest, I didn’t know what all of these options were and just sort of used my best judgment.
- I like stats (that are free)
- I’m happy to have formatted contact names — especially if it lowers the odds I’ll be tossed in the SPAM folder.
- As my blog already retweets to twitter and facebook, I didn’t need those options.
- I did select auto-convert video because of posts like this one with youtube embedded.
Step 8: Select Your Template

I like the basic template. I don’t want fancy columns that end up with emails about 3 words across and an eternity’s worth of scrolling. I wanted it simple and clean.
So, I selected the basic template and hit ‘next’.
Step 9: Add Content To Your Email

For this example, I dragged the ‘RSS Items’ content block onto the email preview and then ‘Social Share’ (whoops, image has the wrong one circled), so people can easily share links to my blog if they liked the post.
Put it in an order that makes sense to you.
Step 10: Decide How Wordy Your Email Should Be

Decide how much of your blog post you want displayed in the email. I opted for ‘Full Content.”
I’m torn here: I’m not huge on busy emails, so I’d probably prefer the Titles, or Excerpts. But. This isn’t for me. People who want an email are likely people who don’t want to go to my blog all the time. I have to remember that not everyone consumes the internet the way I do.
Maybe I should set up 2 ‘weekly blogpost’ emails — one full text and one not?
Then? You just confirm the email and hit publish! And you’re email is ready to go. You can pause and edit it at any time, without messing up the feed.
AND! Best of all? You can preview the upcoming emails.
If you’re interested in signing up for this awesome newsletter/blog update, there’s a bar at the bottom of my webpage, and a tab-link on my facebook author page I also set up. But, I figured I gave you enough step-by-step directions for today.

Do YOU have an email list?
If so, do you have any tips for a newbie?
If not, are you contemplating one now?

Awesome tutorial. Even awesomer: you got a writing mentor, woohoo!
LikeLiked by 1 person
Thanks for reading. I tried to kinda slip that in there… 😉
I’m pretty excited. Now? I need to actually stop blogging and REVISE!
LikeLike
Reblogged this on Chris The Story Reading Ape's Blog.
LikeLike
Thanks for the reblog! Glad you found this helpful.
LikeLiked by 1 person
My pleasure, Morgan 🤗
LikeLiked by 1 person
Reblogged this on jennessjordan.
LikeLiked by 1 person
Thanks for the reblog! Glad you found this helpful.
LikeLike
Thanks for the kick in the pants, Morgan. I need to set up my newsletter as well. It is on my goals list for this year. February is dedicated to some massive writing goals, so looks like I will be doing MailChimp March. I am bookmarking this and I will be back.
I should probably find a Mentor too while I am at it. Congrats on all fronts. 😊
LikeLiked by 1 person
Thanks!
Between research and the post office errand, the whole thing took me maybe 5 hours?
So, if you end up with a free afternoon, or just cannot stare at your writing for one more minute, I’d say it’s about on par with setting up a free WordPress website, using the default template, for difficulty.
LikeLiked by 1 person
Good to know. I have a UPS store at the corner, Maybe I can remember to stop and get the address taken care of in a drive by. 😊
LikeLiked by 1 person
Just to warn you, from what a commenter said on my FB, UPS is MUCH pricier than USPS. I’d check online first.
LikeLiked by 1 person
I will check, but it may end up being a convenience factor. You are so helpful. Thanks again.
LikeLiked by 1 person
Best of luck!
LikeLiked by 1 person
Thank you for taking the time to write this all out. I’m totally keeping this for future reference!
LikeLiked by 1 person
I hoped it would be helpful for other people!
LikeLiked by 1 person
It is nice to see you do a newsletter.
LikeLiked by 1 person
Glad you like newsletters! Apparently, not everyone is a huge fan of checking their RSS feeds 3 times a day and then realizing they haven’t seen [blog X] in a couple weeks, and typing the URL into the addy bar…
LikeLiked by 1 person
I try to read everyone’s blog as much as possible. I enjoy supporting people… like you.
LikeLiked by 1 person
I know the feeling!
LikeLiked by 1 person
well, that sounds a lot more complicated than i’m used to dealing with.I think i’ll leave the newsletter thing for when i’m either desperate enough or am prodded to do so.
I’m glad about the mentor thing though.
LikeLiked by 1 person
THANK YOU so much for these instructions. I’ve gotten as far as setting up the email list enrollment, but I’ve been a bit stymied by the whole newsletter part of it. Bookmarking this post!
LikeLiked by 1 person
Hope it helps!
LikeLiked by 1 person
Very helpful! Thanks Morgan!
LikeLiked by 1 person
thanks! I think I made my personal opinion on email clear, but I recognize the fact other people prefer it, and I want to be as accessible as possible.
LikeLike